Recapping Can Capacitors in Antique Electronics

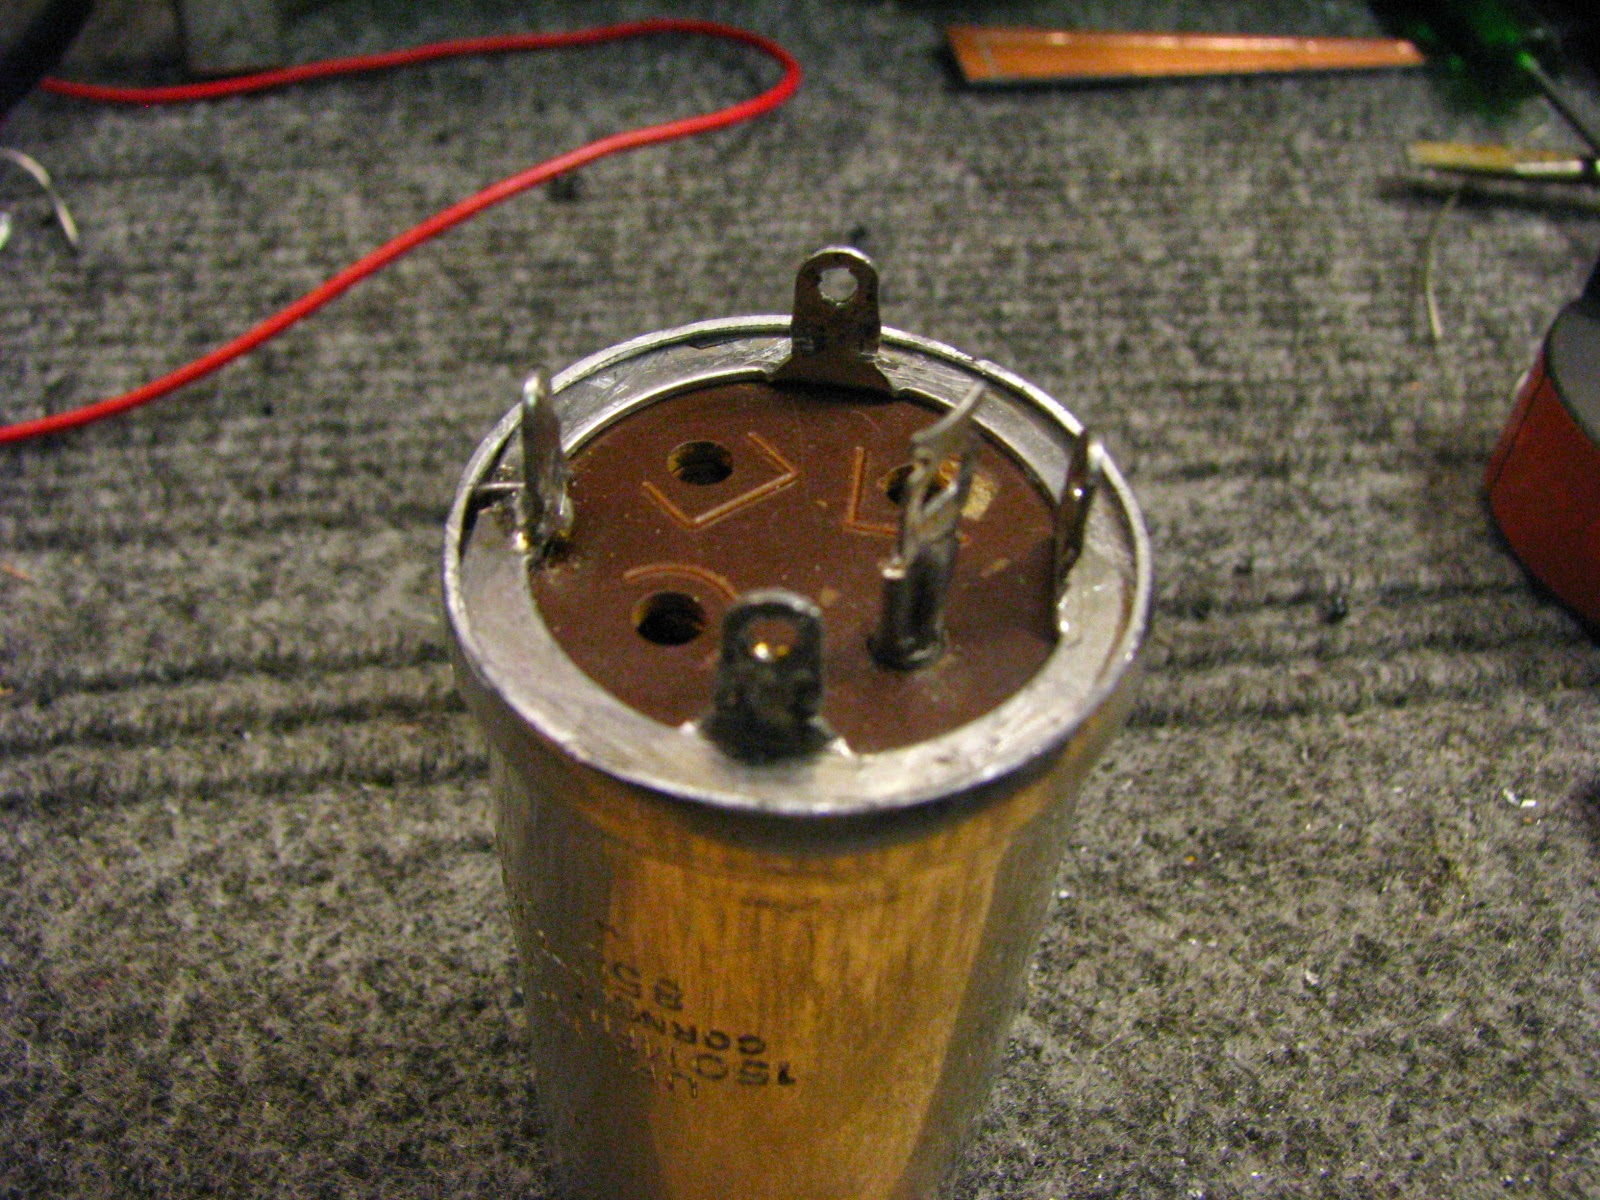
The number one component failure in antique electronic devices is old electrolytic capacitors. Most troublesome are the “can” type multi-segment capacitors. These are hard to find and can be quite expensive. More importantly, even if you find a replacement, it’s likely to be “old stock” and not certain to last since the some aspects of their “clock” started ticking when they were made, not when you start using them.

My approach has been to “re-cap” failed can capacitors with modern capacitors of equal or better ratings. This is cheaper, and also more reliable as long as high quality caps are used. Many think this can’t be done without cutting or damaging the can and impacting the appearance of the equipment. This would, of course, not be desirable in equipment where the can caps are visible, such as old McIntosh power amplifiers.

The rest of this post will show how to re-cap cans so they look completely original when done.

Continue reading

Philips 212 (GA212) Turntable Upgrade

I still have a Philips 212 turntable that I bought new around 1974. This turntable is a classic from the heyday of affordable, but high quality, Hi-Fi gear.

Philips 212 turntable. A classic from 1971.

Over the years, my 212 developed all the ailments familiar to owners of these machines. The main power switch failed, and then the touch buttons stopped working. This post details my repair/modification project.

Continue reading

Renishaw MP11 CNC Probe on a Tormach Mill

There are many CNC touch probes of varying quality available for the Tormach. The two offerings from Tormach are a “passive” probe for about $250, and a “digitizing” probe for $1250. I opted to buy a used Renishaw probe on eBay in an attempt to get the quality and performance of a digitizing probe, but for less than the price of the passive probe.

The cost of used probes on eBay vary all over the map, but I got what I thought was a good deal – a Renishaw MP11 for about $150. My eBay probe came with no cable (more on that later) and had a 1/2″ straight shank, but I figure those shortcomings would not be too hard to rectify.

IMG_8729
MP11 with shop-made TTS adapter

It turned out that my MP11 “deal” was less “great” than I thought because of the “outer diaphragm” issue, which I later found out is common with old Renishaw probes. There are supposed to be two rubber seals that surround the stylus base and keep out dirt while also sealing in some secret oil that prevents corrosion of the contacts. The seals look like tiny gear-shifter boots. They are described (somewhat) in the MP11 manual, starting on page 1-16:

Continue reading

Adding a VFD to an Odd-Duck Milling Machine (Enco 100-1525) Motor

img_7854
Fig 1.VFD box wiring

A while back, I got a nice deal on an early 90’s Enco 100-1525 milling machine. It’s a Chinese 2/3 size Bridgeport copy with an 8″x32″ table. This machine has a 3-phase motor, which I consider a plus because it means I can have knob-controlled speed by adding a VFD (Variable Frequency Drive).

Adding a VFD is usually not too complicated with typical two-speed three-phase motors, but this machine turned out to have a 4.3-to-1 speed ratio between the two ranges (unlike the typical 2-to-1 ratio). With a 2-to-1 ratio, it’s usually fine to run the motor only on the high speed range and then use the VFD for speed reduction. There is a small torque reduction at low speeds when doing this, but for home shop use, it’s fine.

But with the Enco mill motor’s 4.3-to-1 ratio, if I only drive the high speed motor coils and then try to dial down the speed to cover the slow range, the torque loss is too much. This meant I had to keep BOTH motor speed ranges and devise a way to switch between them.

Continue reading

Quick and Dirty Combo PC board & Box

img_7818
PCB/box combo ready to go after a bit of deburring.

Maybe when you get a new hammer, everything is *not* a nail, but when you have CNC, everything turns into a CNC project ;-). I used to hand-cut a lot lot of copper-clad circuit board material for a variety of projects. It was a quick and dirty way to get stuff built, but cutting PC traces and peeling copper with a hobby knife is slow and hard on your hands.

After needing more than one of this little test box, I turned the board AND box into a quick CNC-cut “kit”, much like model airplane parts.  Continue reading

Smartphone Microscope Mount

I needed to get decent images off a microscope in fairly short order. Though I was in a “rush”, it still took a full day to get to a working solution. It is still incredible to me how much time it takes to make something that doesn’t obviously suck.

img_7309
Phone mount clamped to eyepiece. Unfortunately I couldn’t show a phone in place because I need my phone to take the shot. The phone mounts between to two cork pads.

Continue reading

Emco Maximat V10P lathe QC gearbox bearing replacement

Years back I managed to find one of those “dream” home shop machinery deals. An Emco Maximat V10P lathe was sitting in a dusty pile at the back of a bike shop in Alameda, CA. This is a very much sought-after home shop machine. The shop owner said the machine was taking up space, so we made a deal and it followed me home for a more-than-fair price. It’s been a great lathe, but was in far from tip-top shape and has needed some TLC and upgrades. One thing that I’d been meaning to address for long time, is that oil constantly dribbled out of the quick-change gearbox onto my bench. What follows details that fix.

3e8be564-966d-477d-bff0-cffeb5a18695
Emco Maximat V10P after most of the fixes/upgrades

Continue reading

Bose L1 Tower PA Repair

This is a repair of Bose L1 tower PA system. These skinny tower speakers are somewhat of a marvel because they are designed to stand behind the musician (aimed RIGHT AT the microphone) and don’t generate feedback (in most situations). Ah, the miracles of DSP.

It turns out these PA’s have a frequent failure in their power supply. Read on for details.

bose-l1-model-i-586400
1st generation Bose L1 tower PA system

Continue reading

Tormach PCNC 770 DIY Enclosure

I recently got a Tormach PCNC 770 CNC milling machine. So far, I’m very happy with it (but have not cut much yet). I figured that since I wouldn’t be using flood cooling, that I could get away without a full enclosure. But even with mist rather than flood, chips were shot everywhere, so I decided to roll my own enclosure using 80/20 parts https://www.8020.net/

There are lot of similar designs on-line, but the one I used most for guidance was by sauni68 on YouTube: https://www.youtube.com/watch?v=FddiAAuI2Rg

His was a design for a PCNC 1100, but his video still has several good tips that are appropriate for the 770.

Photo Feb 19, 4 47 45 PM

Continue reading